Onetouch Ultra 2 Accuracy Test: Does This Classic Meter Still Hold up Today?
 By Sophia Al-Mansoor
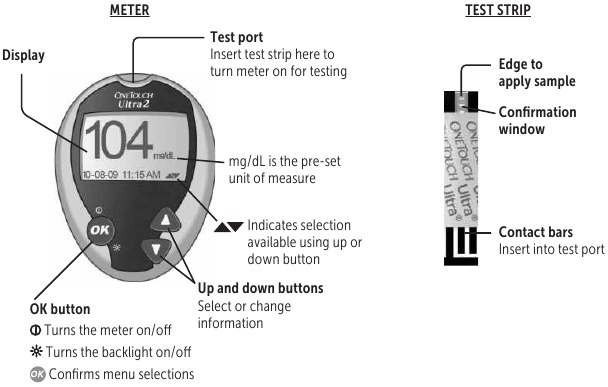
Inaccurate readings on the OneTouch Ultra 2 rarely stem from hardware mechanical faults; they almost always trace back to procedural errors during setup and sample collection. Operating this device accurately requires a rigorous routine.
Step 1: Meter Coding and Calibration
Unlike "no-code" meters that read calibration chips automatically, the Ultra 2 demands manual verification. Insert a test strip into the test port with the silver contact bars pointing upward and pushed completely into the slot. The meter switches on automatically, flashing a three-digit code number alongside a flashing blood drop icon.
Compare this screen number directly against the code printed on the side of your current OneTouch Ultra test strips vial. If the numbers do not match, the biosensor calculates glucose levels against incorrect enzymatic coefficients, producing misreadings as large as 20% to 30%. To correct the code, press the Up or Down buttons on the meter face until the on-screen digits match the vial, then wait three seconds for the screen to lock the setting.
Step 2: Lancing Device Depth Setting and Site Prep
Wash hands thoroughly with warm water and soap, drying them completely. Lingering moisture dilutes the blood droplet, causing falsely depressed mg/dL reading interpretation, while hand sanitizer or food residue causes massive artificial spikes.
Adjust the lancing device depth setting based on skin thickness. Dialing into level 1 or 2 is sufficient for fine skin or pediatric testing; level 3 serves as the standard baseline for adult fingertips; levels 4 and 5 provide the deeper puncture necessary for calloused hands. Lance the side of the fingertip rather than the fleshy center pad, as the sides contain fewer nerve endings and produce less residual bruising.
Step 3: Managing Blood Sample Size Requirements
The OneTouch Ultra 2 requires a 1.0-microliter blood sample size, three times the volume required by modern competitors that function on 0.3 microliters.
Do not aggressively squeeze the fingertip after lancing. Excessive milking forces interstitial fluid into the capillary blood, systematically diluting the sample. Instead, lower your hand below heart level and apply gentle pressure along the base of the finger until a round droplet forms.
Touch the narrow channel on the edge of the test strip directly to the top of the droplet. The strip uses capillary action to pull the sample into its reaction chamber. You must ensure the confirmation window fills completely before pulling away. The screen will display a 5-second countdown timer. If the window fails to fill, do not attempt to dab more blood onto the strip; discard it, insert a fresh one, and test again.
Sophia analyzes international trade, startup ecosystems, retail transformation, and supply chain logistics for modern digital publications.
